Effortlessly Automate Redbubble Design Uploads Using Python
Written on
Chapter 1: Introduction to Automation
Automation simplifies many tasks, and for someone like me who prefers to avoid repetitive work, using Python to automate design uploads to Redbubble is a game changer. This guide will walk you through creating a system to upload your designs to Redbubble effortlessly.

Photo by Ed Leszczynski on Unsplash
Chapter 2: Getting Started with Redbubble
Before diving into automation, ensure you have a Redbubble account. Take note of your username and password, as you will need them later. To facilitate the upload process, start by uploading one design that will serve as your template.
Be mindful of the following aspects regarding your design prior to uploading:
- Design dimensions
- Available products
- Design placement on the product
Since this template will be the basis for all future uploads, it's crucial to ensure that it meets your quality standards. You can also create multiple templates if your designs require specific attributes.

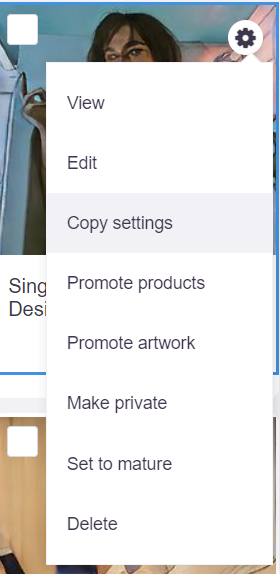
Once your base design is ready, navigate to your portfolio and copy the settings link. This link will be essential for the next steps.

Next, gather the collection of designs you wish to upload. Organize them in a folder that is easily accessible, whether it's stored locally or in the cloud. It’s beneficial to name each file based on how you want it displayed in your Redbubble shop.

With these preparations in place, you are ready to automate the upload process.
Chapter 3: Scripting the Automation
We'll employ the Selenium package in Python to handle the uploading task. Selenium allows for interaction with web applications, making it suitable for this project. Begin by installing the required packages with the following commands:
pip install selenium
pip install chromedriver-autoinstaller
After the installations, set up your environment:
from selenium import webdriver
import chromedriver_autoinstaller
import time
import glob
Next, define your variables for the automation script:
# Set your Redbubble login credentials
username = '{Your Username}'
password = '{Your Password}'
design_upload = [{List of your Design File Names with extensions}]
base_design_url = '{Your Base Design URL}'
With your variables in place, initiate a new instance of Chrome:
# Automatically download chromedriver if needed, then set up Chrome
chromedriver_autoinstaller.install()
driver = webdriver.Chrome()
Once the Chrome instance is ready, the next step is to open the base design webpage and input your login details:
# Navigate to the base design webpage
driver.get(base_design_url)
# Input username
driver.find_element_by_id("ReduxFormInput1").send_keys(username)
# Input password
driver.find_element_by_id("ReduxFormInput2").send_keys(password)
# Click login
driver.find_element_by_css_selector(".app-ui-components-Button-Button_button_1_MpP.app-ui-components-Button-Button_primary_pyjm6.app-ui-components-Button-Button_padded_1fH5b").click()
time.sleep(20)
The above code uses the .find_element_by_id method to locate the HTML elements for the username and password input fields, filling them accordingly. The time.sleep function allows the page to load fully before proceeding.
The following section of the script will loop through your designs and upload them automatically. Please note that Redbubble imposes a daily limit of approximately 50 uploads, so keep that in mind.
for i in design_upload:
# Extract the design name without the extension
img_name = i.split('.')[0]
url_img = '{Your Design Location and the img_name}'
title = '{Your design title and the img_name}'
tags = '{Your intended Tags}'
desc = '{Your design description and the img_name}'
driver.get(base_design_url)
time.sleep(1)
# Fill in the title field
element = driver.find_element_by_id('work_title_en')
element.clear()
element.send_keys(title)
# Fill in the tag field
element = driver.find_element_by_id('work_tag_field_en')
element.clear()
element.send_keys(tags)
# Fill in the description field
element = driver.find_element_by_id('work_description_en')
element.clear()
element.send_keys(desc)
# Upload the image
driver.find_element_by_id('select-image single').send_keys(url_img)
# Click the rights declaration
driver.find_element_by_id('rightsDeclaration').click()
# Allow the upload process to complete
time.sleep(30)
# Submit the work
driver.find_element_by_id('submit-work').click()
# Wait for the process to finish before continuing to the next design
time.sleep(30)
You now possess all the essential scripts needed to automate your Redbubble design uploads. Simply replace the placeholders with your actual data, and you're set to go!
For further insights and to enhance your data science journey, consider connecting with me on LinkedIn or Twitter. Don't forget to subscribe to my newsletter for more valuable content.
If you enjoy this guide and are not yet a Medium Member, I encourage you to consider subscribing through my referral link.
Chapter 4: Video Tutorials
To supplement this guide, check out the following videos that provide additional insights into automating your Redbubble uploads:
The first video titled "Easily Upload Designs To RedBubble with Merch Titans Automation on Autopilot" provides a comprehensive overview of automating design uploads.
The second video, "How To Upload To RedBubble in 2024 AUTOMATICALLY!" offers a step-by-step walkthrough for the automation process.